Set up cachly, step by step
cachly gives your AI coding assistant a memory that lasts beyond one chat. Setup takes about five minutes. It is done when your AI asks its Brain by itself. The last step shows how to check that.
Before you start
- Node.js 20 or newer. Your AI starts the cachly server with
npx. Check it in a terminal withnode --version. If the command is missing, install Node.js from nodejs.org. - A project folder. If it is a git repository, cachly also learns from your commit history.
- No credit card. You start with a free Brain on servers in the EU.
1. Pick your tool
- Claude CodeYou use Claude Code in the terminal or in your editor.
- VS CodeYou use GitHub Copilot or Claude Code inside VS Code.
- JetBrains IDEsIntelliJ IDEA, PyCharm, WebStorm, GoLand or Rider, with Junie, Claude Code or AI Assistant.
- Cursor, Windsurf and othersCursor, Windsurf, Cline, Continue, Zed, Codex CLI or Gemini CLI.
- I already signed upYou created an account on cachly.dev and see your Brain in the dashboard.
2a. Claude Code
- In Claude Code, type these two commands, one after the other:
/plugin marketplace add cachly-dev/cachly-mcp /plugin install cachly-brain@cachly - Start a new Claude Code session. cachly creates a test Brain when the session starts: no account, no key to copy. It has 14 days of the Dev tier, then keeps running on the free tier with the same key.
- Check it in a terminal with
claude mcp list. You should seeplugin:cachly-brain:cachly … ✔ Connected. - Optional, once:
/plugin→ Marketplaces → cachly → Enable auto-update. Claude Code leaves auto-update off for marketplaces outside Anthropic's own.
Then go to Check that it works.
2b. VS Code (GitHub Copilot, Claude Code)
- Install cachly Brain from the Marketplace. Or in VS Code: open Extensions (
Ctrl+Shift+X, on a MacCmd+Shift+X), search for cachly Brain, click Install. - Open your project folder. If VS Code asks whether you trust the authors of the files, choose Yes. In Restricted Mode cachly writes nothing and waits.
- Wait a few seconds. cachly creates your Brain by itself and says so in a message: "14-day free Brain trial started!", or "Brain connected via GitHub" if you are signed in to GitHub in VS Code. There is no form and no key to copy.
- cachly writes the files that connect your AI and tell it to check its memory first:
.mcp.json,CLAUDE.md,AGENTS.md,.github/copilot-instructions.mdand.cursor/rules/cachly.mdc, plus.vscode/mcp.jsonwhere Copilot needs it. Your key is not in these files. It stays in~/.cachly/credentials.jsonin your home folder.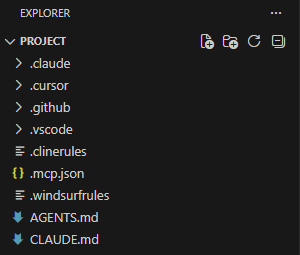
The project after cachly connected it (VS Code extension 0.12.14). - The status bar at the bottom right shows your Brain: how many lessons it holds and how many recalls you used.

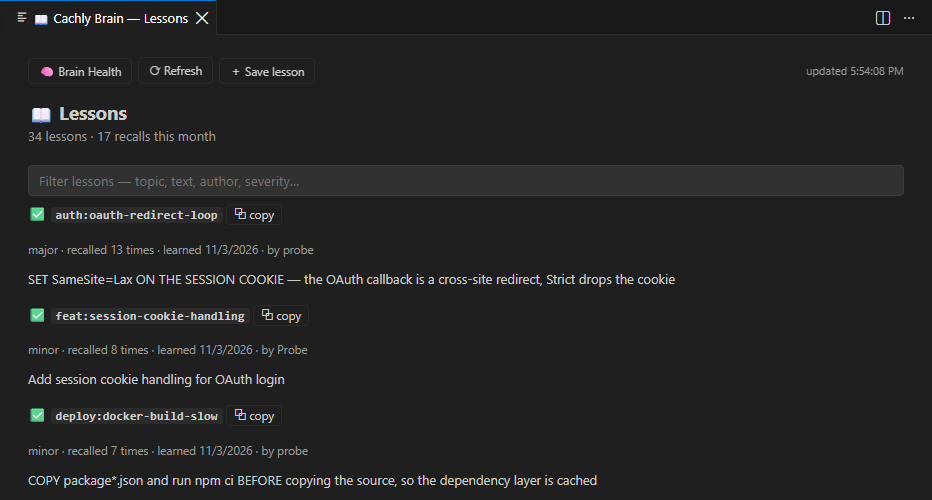
A test Brain with 34 lessons. - Copilot uses cachly from your next chat message, without a restart. If Copilot shows a Start button above
cachlyin.vscode/mcp.json, click it once. Claude Code in VS Code uses it from its next session.
To see what your Brain holds, run Cachly: Show Lessons from the command palette (Ctrl+Shift+P).
2c. JetBrains IDEs
- Install Cachly Brain from the JetBrains Marketplace. Restart the IDE if it asks.
- On the first start, a window asks what the plugin may send. Keep Use the Brain ticked and click Save my choice. The plugin creates a free test Brain, and the status bar shows it.
- In the message that follows, click Set up AI files (or Tools → Set Up AI Files). That connects Junie and Claude Code.
- Using JetBrains AI Assistant? Also click Connect AI Assistant. Then open Settings → Tools → AI Assistant → Model Context Protocol (MCP), tick cachly and press OK. The first start can take about 40 seconds.
Details for each AI tool and what to do if cachly is missing in the list: JetBrains plugin guide.
2d. Cursor, Windsurf, Cline, Continue, Zed, Codex CLI, Gemini CLI
- Open a terminal in your project folder and run:
npx @cachly-dev/mcp-server@latest autopilot - Sign in once. The terminal shows a code and a link, and your browser opens on that link. Confirm the code there. It is free, with no credit card. If no browser opens, copy the link from the terminal.
- autopilot finds the editors you use in this project and writes their files. It also fills your Brain from your git history and adds a git hook that learns from new commits.
- Restart your editor.
What it looks like (a real run, shortened):
$ npx @cachly-dev/mcp-server@latest autopilot

🧠  cachly AI Brain — Setup

Step 1: Sign in to cachly (free, no credit card)
   Code: ABCD-EFGH
   Open this URL and confirm the code:
https://cachly.dev/device?code=ABCD-EFGH
   Waiting for authorization... ✓ Authorized!

⏳ Generating your API key... ✓
⏳ Fetching your instances... found 1
✓  Instance: my-brain (9772236e…)

🔧 Configuring for: Claude Code

✅ Written: .mcp.json
✅ Written: CLAUDE.md
✅ Written: AGENTS.md
✅ Written: .github\copilot-instructions.md
✅ Written: .cursor\rules\cachly.mdc
✅ Written: .windsurfrules
✅ Written: .clinerules
⏳ Bootstrapping Brain from git history (~10s)...
 ✓  2 lessons extracted from git history

🧠 Your Brain now holds 30 lessons.

✅  CLS git hook installed — your brain will learn from every commit.

╔══════════════════════════════════════════════════════╗
║  🚀  Brain is ready.                                 ║
╚══════════════════════════════════════════════════════╝

👉 Next: restart your editor, start a new chat and ask:
      What does my cachly Brain know about this project?
Check the line Configuring for. If your editor is missing there, see If something does not work.
2e. You already signed up on cachly.dev
- Open cachly.dev/setup-ai and sign in.
- Pick your Brain and your editor. Click ⚡ Generate key + Copy one-liner. The command is now in your clipboard.
- Paste it into a terminal in your project folder and run it. It looks like
npx @cachly-dev/mcp-server@latest init --instance-id … --api-key …. - Restart your editor and ask your AI anything. The page shows You're all set! as soon as your AI reaches your Brain.
In VS Code or a JetBrains IDE, the plugin route above is shorter. Both can link to your account later with Link Account, and your lessons move with it.
3. Check that it works
Start a new chat and ask your AI:
What does my cachly Brain know about this project?Your AI should use the cachly tool smart_recall and answer from your Brain. Most chats show that a tool was used; the wording differs per tool. In a git project, the answer names things from your own commits.
If your AI answers without using a cachly tool, see If something does not work.
4. Everyday use
- You do not need to do anything. The rule files tell your AI to check its Brain before a task and to save what it learned after a fix.
- Or ask directly. "Remember that deploys go through make deploy" asks your AI to save it in the Brain. "What did we learn about the deploy?" asks it to look it up.
- See what it knows. In the dashboard, with Cachly: Show Lessons in VS Code, or with Tools → Show Lessons in JetBrains.
- Your key stays out of the project. It lives in
~/.cachly/credentials.jsonin your home folder. The project files hold only the server address and your Brain's ID, so you can commit them.
If something does not work
.cursor or .windsurf). Run it again with the editor named, from the same project folder: npx @cachly-dev/mcp-server@latest init --editor cursor. The editor names are cursor, windsurf, copilot, continue, codex and gemini.npx @cachly-dev/mcp-server@latest doctor in your project folder. In VS Code use Cachly: Run Brain Doctor, in JetBrains Tools → Run Brain Doctor. It checks the key, the Brain and the connection and names the step that fails.Still stuck? Write to [email protected] with a screenshot of where it stopped. A person answers.
More: MCP integration · JetBrains plugin guide · Claude Code hooks